


You may think you’ve seen it all when it comes to docs authoring and publishing—heavy desktop apps relying on their own source content structuring and publishing streams, static (docs) website generators feeding on Markdown, reStructuredText or content written in other markup languages, all sorts of web-based CMS, CCMS, headless CMS, and similar systems, but it seems that there’s still a word or two to be said. And it may be that JetBrains has just said the word: Writerside.
Intro
Writerside is a new documentation authoring tool, or should we say an IDE, published by JetBrains who are well known for developer tools such as IntelliJ IDEA, PyCharm and others. By looking at the Writerside website, one of the first things that pops out is their slogan:
Built by documentarians…
for documentarians
To see whether it really is a tool that solves the problems of an average documentarian, we took it for a quick spin, as its authors kindly asked us to on their website. The following sections present an independent and unbiased review of Writerside .
Starting the application
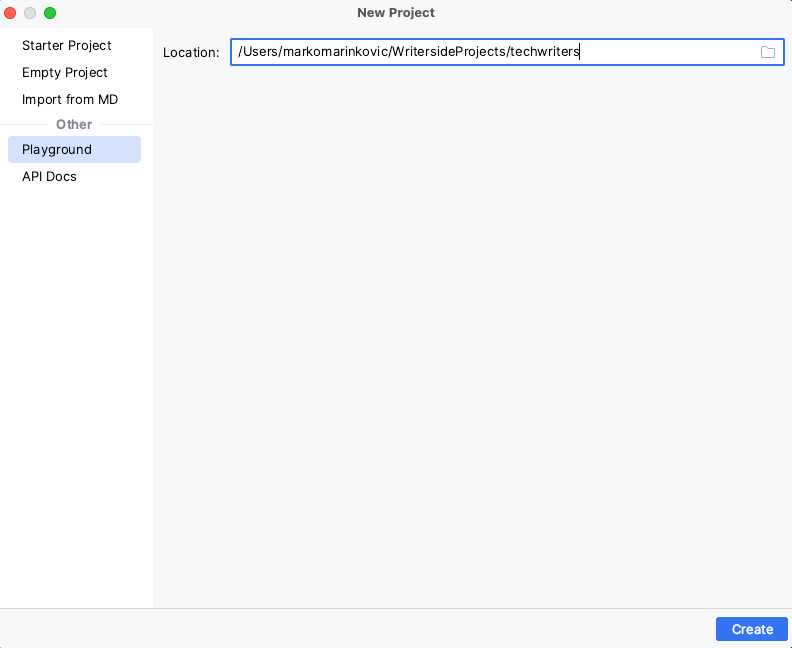
When you start the app for the first time, it shows a set of options that you’d likely expect from an authoring tool: create a new project, or open an existing one. It is rather convenient that you can also load an existing project directly from a version control system at this point. Apart from these, you can also make customizations or add plugins, but as a new user you probably won’t be dealing with these at this point. Instead, let’s just select New Project.
The New Project dialog offers several options on the left, and it might not be clear at the very beginning what each of them is used for. Empty Project, Import from MD and API Docs are self-explanatory, but Starter Project and Playground, well, you’re not sure what to expect until you’ve tested them or watched the Getting Started video. Apparently, a Starter Project is a minimal project containing a single instance and a single topic to get you started with your docs project without having to remove a bunch of demo content, while Playground offers a more elaborate project setup and way more content to play with. Therefore, Playground seems as the ideal starting point for a review.
First glance at the main screen
Once you’re inside your Playground project, the first impression is that you’re in a nicely organized and uncluttered environment and if you’ve ever seen or used an IDE for coding, you’ll immediately realize that this is a full-blown IDE. If you’re used to text editing and word processing tools to write documentation and have no prior experience in coding in an IDE, this might seem confusing at first. On the other hand, there is for sure the group of people who spent hours installing and configuring plugins for Atom (R.I.P.), VS Code or whatever their text editor of choice is, to try and make it work like and IDE for docs. And look, now they gave it all to us, out of the box!
The top-left box of the main Writerside screen shows two help instances, named Help Instance and Second Instance. Essentially, instances are the most important building block of single sourcing in Writerside. A project can contain multiple instances, each of them representing a new documentation output for a different version of the product or, for example, a different audience.
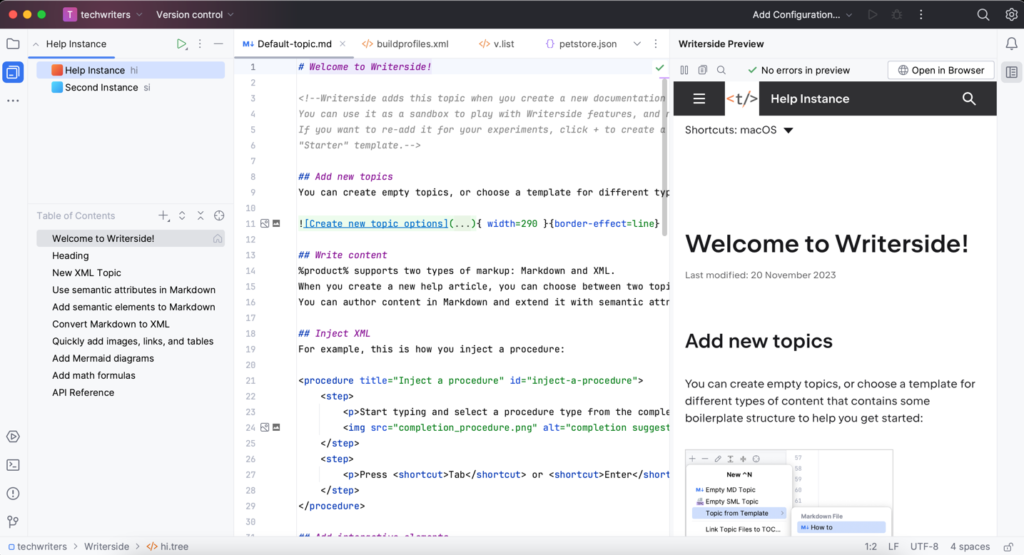
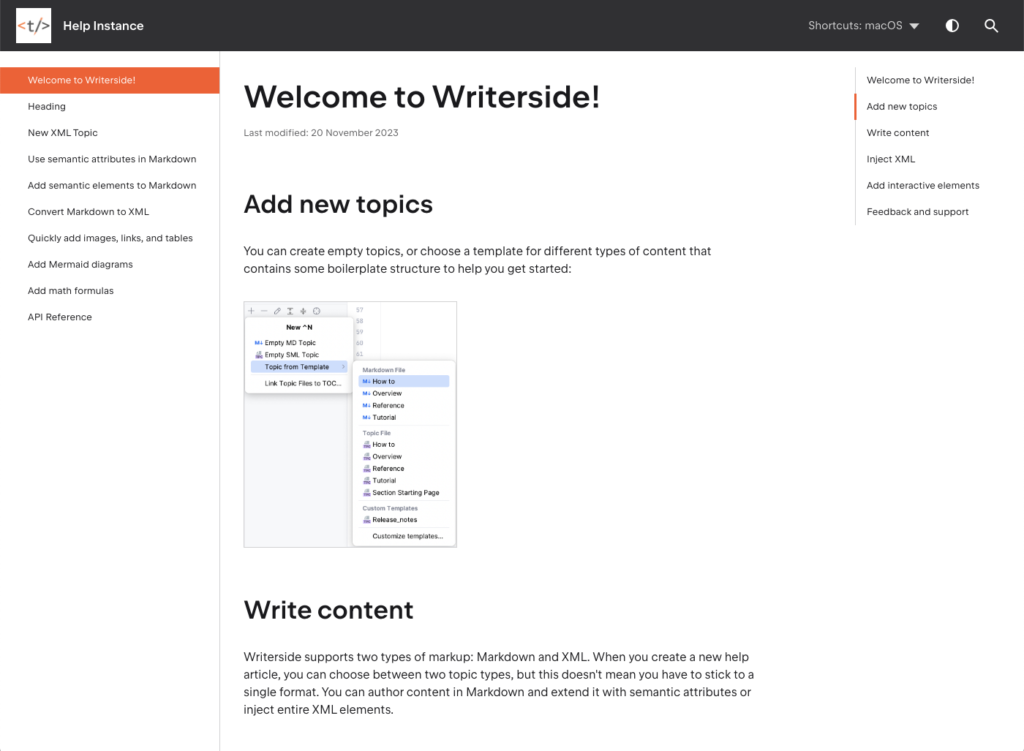
Each help instance consists of its own Table of Contents, which includes the full structure of topics that you can add, remove, move around, or reuse between instances. When you click on a topic it opens in the editor, along with a live preview pane that enables you to see a preview of the output almost instantly as you type. This is a huge benefit—you can see what your docs will look like when published, with the full formatting, images and website design, and you don’t have to run a local server or do a test build—it’s simply right there.
Creating and managing content
One of the first things that you notice when you start adding topics to Writerside is the selection of document formats, which can either be Markdown (.md), or the XML-based semantic markup (.topic). Yes, I did put my index finger on my chin when I saw XML and semantic markup mentioned next to each other.
If you’ve ever written at least some slightly more complex documents that require merged cells in tables, or you want to put some content in a collapsible block for the readers to expand only if they need and want to, you know that plain Markdown won’t do the trick. This is where semantic markup comes into play. It allows you to create more complex topics when it comes to structuring, UI elements, and formatting. To see it in action, it is enough to open the sample Welcome to Writerside! topic and see the combination of Markdown used mostly for paragraphs with basic inline formatting, while semantic markup is used to showcase the nice UI elements like tabbed sections and collapsible blocks that we often use in documentation, but not every tool(chain) supports out of the box.
Yet another markup?
If you’re a documentarian with at least some experience with structured authoring under your belt, you will certainly recognize a big share of concepts behind the list that pops up when you type < in the editor. With simple block level elements, such as admonitions or embedded videos you will likely guess the basic syntax right the first time. Structural tags such as <chapter>, <topic>, or <procedure> may require more adaptation and learning about their inner structure and the right way to use them. If you have previous experience with DITA, some of these may seem familiar, but their intended purpose or use might not be what you expect. To what extent your previous knowledge will help or hinder you here, it’s highly individual.
Ultimately, the semantic markup used in Writerside completely makes sense as a way to add structure and a number of missing UI elements in documentation topics, and is a logical combination of semantic syntax that resembles DITA to an extent, and not-so-semantic elements that are rendered as specific UI features that help organize content or make it more compact. It does come with a learning curve, especially when it comes to nesting, positioning, and available attributes. You can always press F1 to get explanations and examples, but those are not always helpful and some are missing, so you’re probably in for a lot of trial and error until you can properly structure a topic and make every element look exactly the way you want it to in the final output. However, from that point on you can be pretty confident that you have a solid base for creating an optimized and powerful documentation set even for big and highly structured projects.
Single sourcing
When it comes to single sourcing, Writerside offers a solid set of options and familiar concepts, implemented in their own way that, again, may take some getting used to.
Reusing a single topic from one instance to another is pretty easy, when you realize that Link Topic Files to TOC is actually the option you need to use. Reusing a group of topics might not seem that easy at first, but once you have a look at the documentation and try it for the first time, it actually makes a lot more sense.
Content reuse on a smaller scale works mostly as expected: elements in a topic that have their own IDs, or are explicitly defined as snippets and given IDs, are included using the simple <include> tag that requires only the name of the source topic and the ID of the element to be included. There is also the neat library feature that allows you to put a snippet into a single separate topic, and the only purpose of that topic is to be reused inside other topics and is not included anywhere in the ToC by default.
Finally, variables complete the set of content reuse and single sourcing features in Writerside. The one thing that is specific for Writerside is that it’s and IDE, so some configuration options will require a series of clicks to get to the right dialog, while others require editing of specific project configuration files, and this might be a bit confusing until you get used to where to find which option. Variables are one of the things you’ll have to define in the corresponding configuration file named v.list. The documentation does explain types of variables and how they work, although it might be more explicit about how to define a variable per instance which may be the most common use case, but you’ll have to infer it yourself from the example code. Other than that, once you’ve defined your first set of variables and used them in your topics, including the option to parse or render variables in code blocks, they behave as expected.
API documentation
The approach to API documentation is mostly expected and typical for docs as code, as it relies on the provided Swagger/OpenAPI specification file. However, there is one thing that makes Writerside stand out where some other popular tools surprisingly fall short. This is the full integration of API documentation into the rest of the docs, for a single documentation instance. You choose where to create the root topic for the API reference and Writerside does the rest—creates the corresponding content for each of the API calls. Even though API documentation uses the API specification file as its source instead of Markdown and semantic markup, Writerside conveniently keeps all of the docs in a single place and allows you to use the same flow for publishing and management in general. A very nice feature indeed.
You can also restructure the API reference by creating a separate page for each API endpoint. This may prove beneficial since many API generators create a single page for the entire API reference, making individual API endpoints just ugly anchors that are difficult to link or navigate, while the single endless page may take some time to load. In Writerside, creation of individual pages for each API endpoint is a manual process that requires you to create a separate topic for each endpoint and then refer to it in the reference file, but on the other hand, this provides more control over the content of each page. Control means that you can combine what’s generated from the API specification with your custom descriptions request/response samples and other page content.
Search it, build and deploy
The great finale of your documentation authoring and publishing work is the process of tweaking, building, deploying the final output. In a corporate setting, this part of the process is probably the one that’s most likely to be compared and evaluated against the code deploy process that you already have in your work environment.
Apart from creating a local build and the option to serve the content locally, GitHub, GitLab, and TeamCity Cloud are offered as documented and tested CI options for a more serious, production-grade pipeline. According to the documentation, the idea behind using GitHub and GitLab is for the content to finally end up on GitHub or GItLab Pages, respectively. However, if that’s not where you want to host your final output, you’re in for some (re)configuration to create your artifacts in your own CI/CD environment and setup, and deploy them to the location where you want them to be hosted. As Writerside offers a whole development environment, this whole approach may be quite different from what you are used to with an average command-line tool that’s used to build and serve your docs locally for preview purposes, but at the same time used in your CI setup to create staging or production builds.
Another thing to bear in mind is the search functionality. Currently, local previews provide a frontend-based search that does the job, but once you deploy your documentation website, you’ll have to use Algolia to handle the search. Even though Algolia is an amazing as a search provider and offers a number of options to configure and customize your search, it might be an overkill for small documentation projects that could do with just a basic search functionality. In addition, when building the final output with GitHub and publishing on GitHub Pages, build and upload of the Algolia search index is included in the script. However, it seems that there isn’t an equivalent functionality for GitLab, which might mean that you have to handle search index updating separately. JetBrains does promise to make their embedded search available in the produced documentation output, so we’re eager to see that happen and get the additional flexibility in choosing how to handle the search in the final docs output.
Collaboration
Collaboration is one of the standard pain points in the docs as code approach and that’s not in any way specific to Writerside. You can have your reviewers look at the docs output that is deployed as a staging website, but there isn’t an integrated option of providing feedback and additional input. On the other hand, reviewers can check out the source files and use the standard git flow to provide their comments and input. In case of an internal review done by your peers or editors in the documentation team, this is completely OK as it’s expected for everyone on the team to be able to read and modify source files easily. However, external stakeholders might face a huge obstacle, especially with files that are rich in semantic markup. This is something where some web based (C)CMS systems do better, but usually use that opportunity to put a price tag on (additional) reviewer accounts.
Customization
Once you’ve invested the effort to master Writerside, understand the way it works, proper hierarchy of XML tags and maybe even imported loads of your own content, there’s no doubt you’ll want to make the final output match your company’s branding or simply your own preference. This is where you’ll have to resort to configuration files again. Even though you might expect easy and direct access to HTML and CSS files, unfortunately appearance of the output can be modified only via the buildprofiles.xml configuration file, where you can choose from predefined color profiles and presets, add the website logo and customize the content of the footer.
On the one hand, this approach does make things simple and easy, while providing the basic customization options. You wouldn’t normally expect too many bells and whistles on a regular documentation website anyway, would you? Also, it is quite straightforward for a technical writer who doesn’t have CSS skills to make this type of customizations on their own. On the other hand, having the ability to edit at least CSS directly would provide a wide range of options to make your docs really feel like an integral part of your product and its branding, so the available options really set narrow boundaries for those who could do a lot more to add their touch to the final output. Again, we have a promise from JetBrains that next releases will offer more in terms of output customization, so let’s wait and see.
Conclusion
To put it simply: When you take all of its features into account, Writerside is a truly refreshing piece of software and likely the first of its kind on the technical writing scene. It treats technical writing as an actual development-like discipline and uses the vast JetBrains experience in creating IDEs for developers to offer a similar set of options for technical writers. Until now, any docs as code project boiled down to a more or less complex set of moving parts, with at least one person on every technical writing team who would have to take care of oiling and maintaining the machinery in order to keep it running. Writerside certainly integrates many, although not all, of those moving parts and makes the documentation authoring and publishing effort more streamlined.
Here is a summary of the most significant pros and cons of Writerside:
Pros
- Integrates documentation authoring structuring, preview and other functionalities into a single IDE
- Output preview is live and within the IDE
- Semantic markup is powerful, makes up for shortcomings of Markdown and translates into very useful UI elements in the output
- Single sourcing and content reuse options should cover most requirements of creating documentation for complex sets of modern software products
- API documentation integrated into the authoring and publishing flow with the rest of the docs
- A good set of demo material to get started
Cons
- Lacks more user friendly options for content reviews and providing feedback
- Could use more flexible search options and better integration with Algolia
- Limited customization options for the final output